AEGIS® Shaft Grounding Ring Installation
What You Will Find in the Installation Guide:
- Shaft Preparation for Internal and External Installation
- General Installation Instructions
- uKIT Installation
- Conductive Epoxy Installation
- Clamp-on Installation
- Bolt Through Installation
- Press Fit Installation
- PRO Series Installation
You’ll find our interactive AEGIS® installation instructions below. Or to print a copy, you can download our Installation Instructions pdf.
Motor shaft must be free from sharp edges and mechanical discontinuities: Ensure that the selected shaft location for the ring is smooth and free from any keyways, balancing holes or the like.
Motor shaft must be conductive: Shaft must be clean and free of any coatings, paint, corrosion, or other nonconductive material (clean to bare metal). Depending on the condition of the shaft, it may require using emery cloth or Scotch-Brite™. Once the shaft is visibly clean, a non-petroleum-based solvent may be used to remove any residue. If possible, check the conductivity of the shaft using an ohmmeter.

![]()
If possible, adjust or change spacer and screw lengths to avoid the keyway, or fill the keyway (in the area where the AEGIS® microfibers will be in contact with the shaft) with a fast-curing epoxy putty such as Devcon® Plastic Steel® 5 Minute® Putty. Ensure smooth transition at edges of epoxy and shaft.
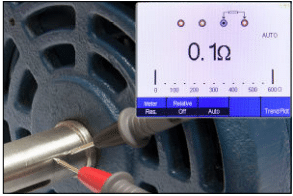
Basic Surface Resistance Test
Place the positive and negative meter leads on the shaft where the microfibers will contact. Each motor will have a different reading, but in general, you should have a maximum reading of less than 2 ohms anywhere you check the shaft. If the reading is higher, clean the shaft again and retest.
AEGIS® CS015 Colloidal Silver Application:
Recommended for all applications.
The safety Data Sheet with PPE information is available for download.
If possible, gently warm the shaft when the AEGIS® CS015 will be applied. This helps the CS015 cure faster. Allow CS015 to come to room temperature prior to opening.
Thoroughly stir the silver coating.
Apply a thin, uniform coat of the AEGIS® Colloidal Silver Shaft Coating to the area where the AEGIS® microfibers will be in contact with the motor shaft. Apply all around the shaft. Wait for the first coat to dry to a tack free surface. Drying can be accelerated with the use of gentle heat from a heat gun, but don’t exceed 200°F (93°C) while curing.
Apply a 2nd thin, uniform coat of CS015.
Allow CS015 to dry to a tack free surface before installing the AEGIS® Ring.
Allow the CS015 to cure completely before running the motor. The coating will cure at room temperature in 16-20 hours or in about 60 minutes at 200°F (93°C).
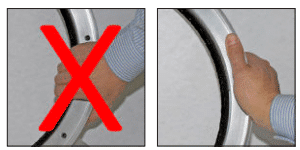
Take care when handling the ring. Do not crush fibers.
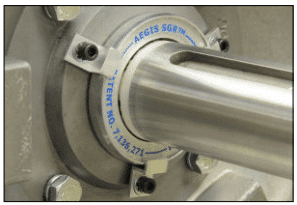
Install the AEGIS® SGR so that the aluminum frame maintains an even clearance around the shaft. AEGIS® conductive microfibers must be in contact with conductive metal surface of the shaft. Care should be taken when handling the ring to prevent fiber damage during installation.

 Do not use thread lock to secure the mounting screws as it may compromise the conductive path to ground. If thread lock is required, use a small amount of EP2400 AEGIS® Conductive Epoxy to secure the screws in place.
After installation, test for a conductive path to ground using an ohmmeter. Place one probe on metal frame of AEGIS® Ring and one probe on motor frame. Reading should be < 1 ohm.
Motor must be grounded to common earth ground with drive according to applicable standards.
Where excessive debris is present, additional protection of the AEGIS® fibers may be necessary. Installing an O-ring or V-slinger against the ring is sufficient in some cases. Contact Customer Support for more information.
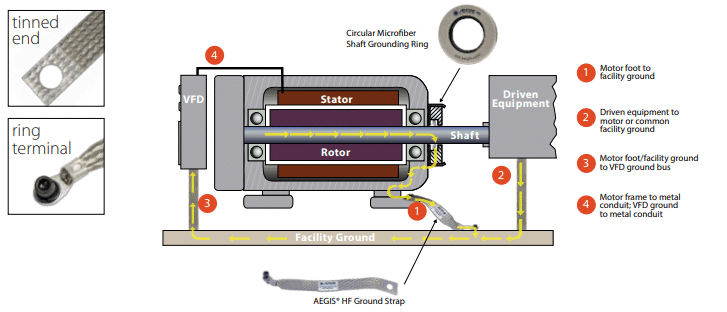
Motor Grounding
Motor must be grounded to common earth ground with drive according to applicable standards.
Recommended: AEGIS® HFGS High Frequency Ground Strap
When installing HFGS, ensure metal-to-metal contact at both terminals by removing paint or corrosion (down to clean, bare metal) at the motor foot and the ground location. Secure tinned end to motor foot. Secure ring terminal to metal ground.
AEGIS® SGR uKIT Includes:
(1) AEGIS® SGR Shaft Grounding Ring (solid or split ring)
- (4) universal bracket sets of each size (16 total)
- (4) 5-40 x 3/8” at head screws (for ring to bracket connection) (IEC Kit: same)
- (4) 6-32 x 3/8” socket head cap screws (IEC Kit: M4 x 10mm SHCS)
- (4) #6 split lock washers (IEC Kit: M4)
- (4) #6 at washers (IEC Kit: M4)
- 5/64” allen wrench
- 7/64” allen wrench (IEC Kit: 3mm)
Tools required for installation:
- 36 drill (IEC Kit: 3.3mm or #30)
- 6-32 tap (IEC Kit: M4)
- Fine grit emery cloth/sandpaper
- CS015 AEGIS® Colloidal Silver Shaft Coating (recommended)
Additional Tools for Easy AEGIS® Conductive
Epoxy mounting:
- EP2400 AEGIS® Conductive Epoxy (sold separately)
- Dremel tool for removing paint on motor end bracket
- Heat gun to expedite curing time of conductive epoxy


- Prepare the shaft as per the shaft preparation instructions.
- For Solid Ring choose either a 3 or 4 hole bracket pattern based on the configuration of the motor end bracket. Use a minimum of 3 brackets to safely secure the uKIT. Split Rings use 4 hole pattern.
- Select a bracket based on the clearance needed on the motor end bracket/slinger/shaft shoulder. For specifications of each bracket, visit www.est-aegis.com/uKIT
- Using the 5/64” allen wrench, assemble the brackets to the AEGIS® ring using the 5-40 x 3/8” flat head screws.
- Split Ring Only: The plastic hinge is used as an installation aid to keep the two sections attached. Do not remove the tape release paper at this time.
Drill and Tap Instructions
Determine drill points:
- Solid Ring: Place the ring over the shaft. Maintain an even clearance around the shaft. Conductive microfibers should be in contact with the shaft. Mark drill points.
- Split Ring: For Split Ring, a .04” (1mm) space between both halves of the ring is needed to maintain the roundness of the ring. When the ring is cut in half at time of production, some material is removed. Use the spacers provided to aid in alignment—mark drill points.
- Drill holes into motor end bracket:
- Using a #36 drill (IEC Kit: 3.3mm or #30). Avoid drilling into bearing.
- Depth of hole should be 1/4” (6mm)
- Tap each hole with a #6-32 tap (IEC Kit: M4)
Install uKIT
Solid Ring: Install the uKIT and secure to the motor using the hardware provided.
Split Ring: Remove the tape release paper from the 2 tabs and place the uKIT around the motor shaft.
Add the spacer to the ring as shown above then press the ring segments together to secure the tape.
Be sure to have a .04” space to ensure roundness of the ring. Mount brackets to the motor using the
6-32 (IEC Kit: M4) cap screws, split lock washers and at washers provided. The bolts provide the path to ground. Do not use Loctite© or any other non-conductive material to secure the screws. Once ring is secure to the motor, remove the spacer and discard.
Attach AEGIS® Installed sticker to motor.
Conductive Epoxy Instructions
AEGIS® Conductive Epoxy EP2400 sold separately.
Mark your epoxy locations.Remove paint on the motor end bracket where the AEGIS® uKIT brackets will be attached. These areas must be clean & free of any coatings, paint, or other nonconductive material.
Prepare conductive epoxy per package directions then apply to universal mounting brackets.
Install uKIT:
Solid Ring: Install the uKIT around the motor shaft. Hold the uKIT in place until epoxy is firmly holding. Allow epoxy to cure for 4 hrs at or above 75°F (24°C). For the quickest curing time, use a heat gun to heat epoxy for 10 minutes, then allow it to cool.
Split Ring: For Split Ring, a .04” (1mm) space between both halves of the ring is needed to maintain the roundness of the ring. When the ring is cut in half at time of production, some material is removed. Use the spacers provided to aid in alignment.
Remove the tape release paper from the 2 tabs and install the uKIT around the shaft. Add the spacer to the ring as shown below then press the ring segments together to secure the tape. Be sure to have a .04” space to ensure roundness of the ring. Place the uKIT against the motor end bell, ensure even clearance around the shaft and hold in place until epoxy is firmly holding. Allow epoxy to cure for 4 hrs at or above 75°F (24°C). For the quickest curing time, use a heat gun to heat epoxy for 10 minutes, then allow it to cool.
![]()
- EP2400 GHS SDS available for download.
- Remove paint on the motor end bracket where the ring will be attached. These areas must be clean and free of any coatings, paint, or other non-conductive material. This is the discharge path to ground, and therefore metal to metal contact is essential.
- Prepare the shaft as per the shaft preparation instructions prior to mixing the epoxy.
- Install the ring so that the aluminum ring is concentric around the shaft. Conductive MicroFibers™ must maintain uniform contact with conductive metal surface of the shaft.
- The epoxy cures at room temperature in 4 hours at or above 75°F (24°C). For the quickest curing time, use a heat gun to heat epoxy to 150-250°F (66-121°C) for 10 minutes, then allow to cool.
- Mix AEGIS® Conductive Epoxy EP2400 according to package directions. Apply a layer of epoxy to the back side of the AEGIS® SGR. Use protective gloves during application. Pot life is approximately 10 minutes at 75°F (24°C).
- SOLID RING: Install the ring and hold in place until epoxy is rmly holding the ring.
- SPLIT RING: Split Ring must be installed on a at surface. Remove the tape and spacer from one edge of the ring. Install over shaft. Retape the ring together, ensure spacers are in position and push ring back to the end bracket. Hold ring in place until epoxy is rmly holding the ring. Once epoxy is cured, remove spacers and tape.
- If you have a slinger or a shaft shoulder that is less than 0.375”(9.5mm), you will need the uKIT style ring.
- Attach AEGIS® Installed sticker to motor.

 Prepare the shaft as per the shaft preparation instructions.
English Mounting Hardware- part number suffix -1. Includes AEGIS® Ring, clamps, 6-32 x 1/4” SHCS, and
washers.
- Drill (2 to 4) holes in end bell using a #36 drill
- Depth of hole should be 1/4”. Caution: do not drill into bearing
- Tap each hole with a #6-32 tap
Metric Mounting Hardware- part number suffix -2. Includes AEGIS® Ring, clamps, M3 x .50 x 8mm SHCS,
and washers.
- Drill (2 to 4) holes in end bell using a 2.5mm drill
- Depth of hole should be 6mm. Caution: do not drill into bearing
- Tap each hole with a M3 tap
 Solid Ring: Hold the ring in place by fastening clamps to motor end bracket using screws and washers provided. Use a minimum of 2 mounting clamps to ensure proper ground connection.
Split Ring: Must be installed on a at surface. Peel back one side of the tape to disconnect the 2 pieces of the ring. Place the ring over the shaft. Pinch both halves together, ensure spacers are in place and replace tape firmly against side of ring. The spacers remain in place until the ring is firmly mounted to the end bell. Use a minimum of 4 mounting clamps to ensure proper ground connection. Once secure, remove spacers and tape. Attach AEGIS® Installed sticker to motor.
Do not use Loctite© or any other non-conductive material to secure the screws.
If you have a slinger or a shaft shoulder that is less than 0.375”(9.5mm), you will need the uKIT style ring.
Prepare the shaft as per the shaft preparation instructions.
Offered with various mounting hardware including flat head cap screws and standard cap screws.
- Drill holes in motor end bell
- Depth of hole should be 1/4” (6mm). Caution: do not drill into bearing.
- Tap holes

Attach AEGIS® Installed sticker to motor.
- Secure the ring to motor end bracket using screws and washers provided.
- Do not use Loctite© or any other non-conductive material to secure the screws.
- If you have a slinger or a shaft shoulder that is less than 0.375”(9.5mm), you will need the uKIT style ring

 No oils or other lubricants should be used to assist installation as this may prevent the conductive path to ground.
Follow Press Fit Specification & Tolerance below for standard parts. For custom parts, refer to the manufacturer’s drawing.
Do not use Loctite© or any other non-conductive material.
Attach AEGIS® Installed sticker to motor.
Press Fit Specification & Tolerance for Standard Parts
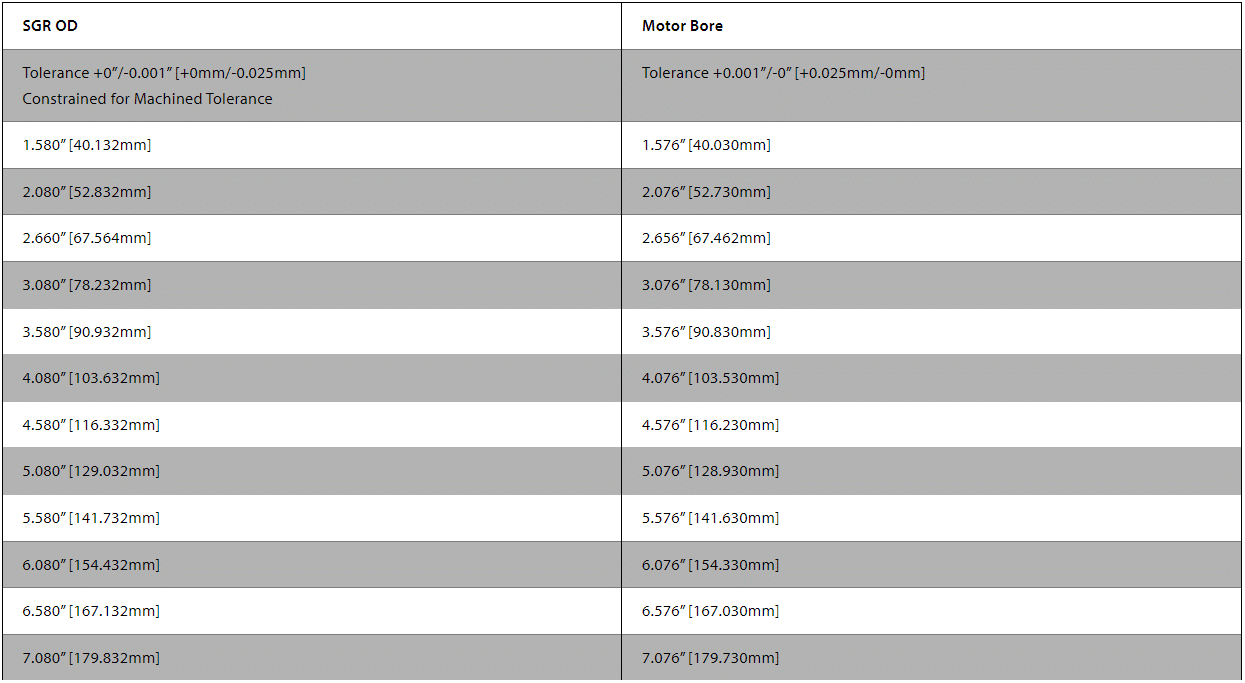
It is important to stay within the tolerance noted to ensure optimum shaft grounding. If the AEGIS® Ring has an OD that is different from these above, then you have a custom ring and should refer to the drawing for Motor Bore dimensions. Contact Customer Service for specifc drawing.
WARRANTY: Units are guaranteed for one year from date of purchase against defective materials and workmanship. Replacement will be made except for defects caused by abnormal use or mishandling. All statements and technical information contained herein, or presented by the manufacturer or his representative are rendered in good faith. User must assume responsibility to determine suitability of the product for intended use. The manufacturer shall not be liable for any injury, loss or damage, direct or consequential arising out of the use, or attempt to use the product. AEGIS® SGR, AEGIS® Bearing Protection Ring, Conductive MicroFiber™ are trademarks of Electro Static Technology-ITW
Drive end: Install one AEGIS® Bearing Protection Ring.
Non-Drive End: Bearing housing must be isolated with insulated sleeve or coating or use insulated ceramic or hybrid bearing to disrupt circulating currents.
Note: The recommendation above is the preferred configuration for most applications. Contact us with any questions.
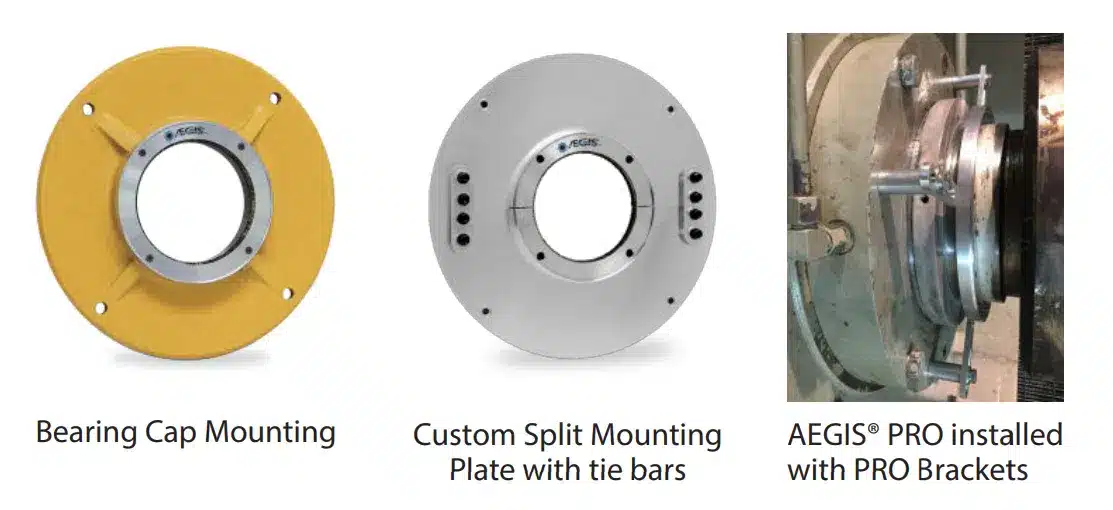
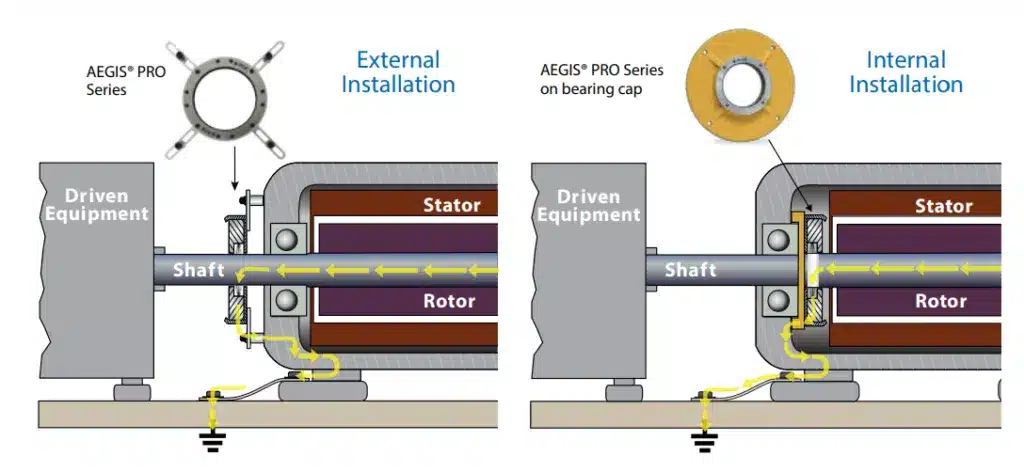
- Drive End External Installation:
- Solid Ring – Secure using bolt through mounting hardware or brackets (sold separately).
Solid Ring-Press Fit – Clean, dry press fit. See AEGIS® drawing for motor bore dimensions.
Split Ring – Disassemble ring by removing screws from the face. Reassemble PRO on shaft. Secure to motor with bolt through mounting hardware or brackets.
- Solid Ring – Secure using bolt through mounting hardware or brackets (sold separately).
- Drive End Internal Installation:
- Install on bearing cap using bolt through mounting method